Total Pageviews

Wednesday 27 February 2019

Plastic crates a quick how to

I was asked how I made the extra stowage for my tanks and vehicles so I got a bit of time today so I did a quick how to on the boxes and crates. Please bear with me it was a tad rushed.

I use plastic strip, rod and card to make these these and sizes are normally just judged by what look rights. Crates and boxes come in a variety of shapes and sizes but these are mainly based for ww2 onwards.


Picture 1, various sizes of plastic card, and strips and hollow bar.

Picture 2, the hollow bar has being cut roughly 14mm lengths .
Far left plain hollow bar, centre as being capped at one end with thin plastic card, right side plastic card to stick on to the far end of the hollow bar. This creates the solid box shape for the crate.

 
Picture 3, bottom hollow bar shows area to be cut out to create an open crate, top picture shows the area removed and cut to size.

 
Picture 4, shows one end capped and the other piece of plastic card ready to cap the other end.

Picture 5, cut short lengths of thin bar to stick on the end both open and closed crate. 

Picture 6, thin bar stuck to the end of the crates. 

Picture 7, cut and glue a second bar to the opposite end.

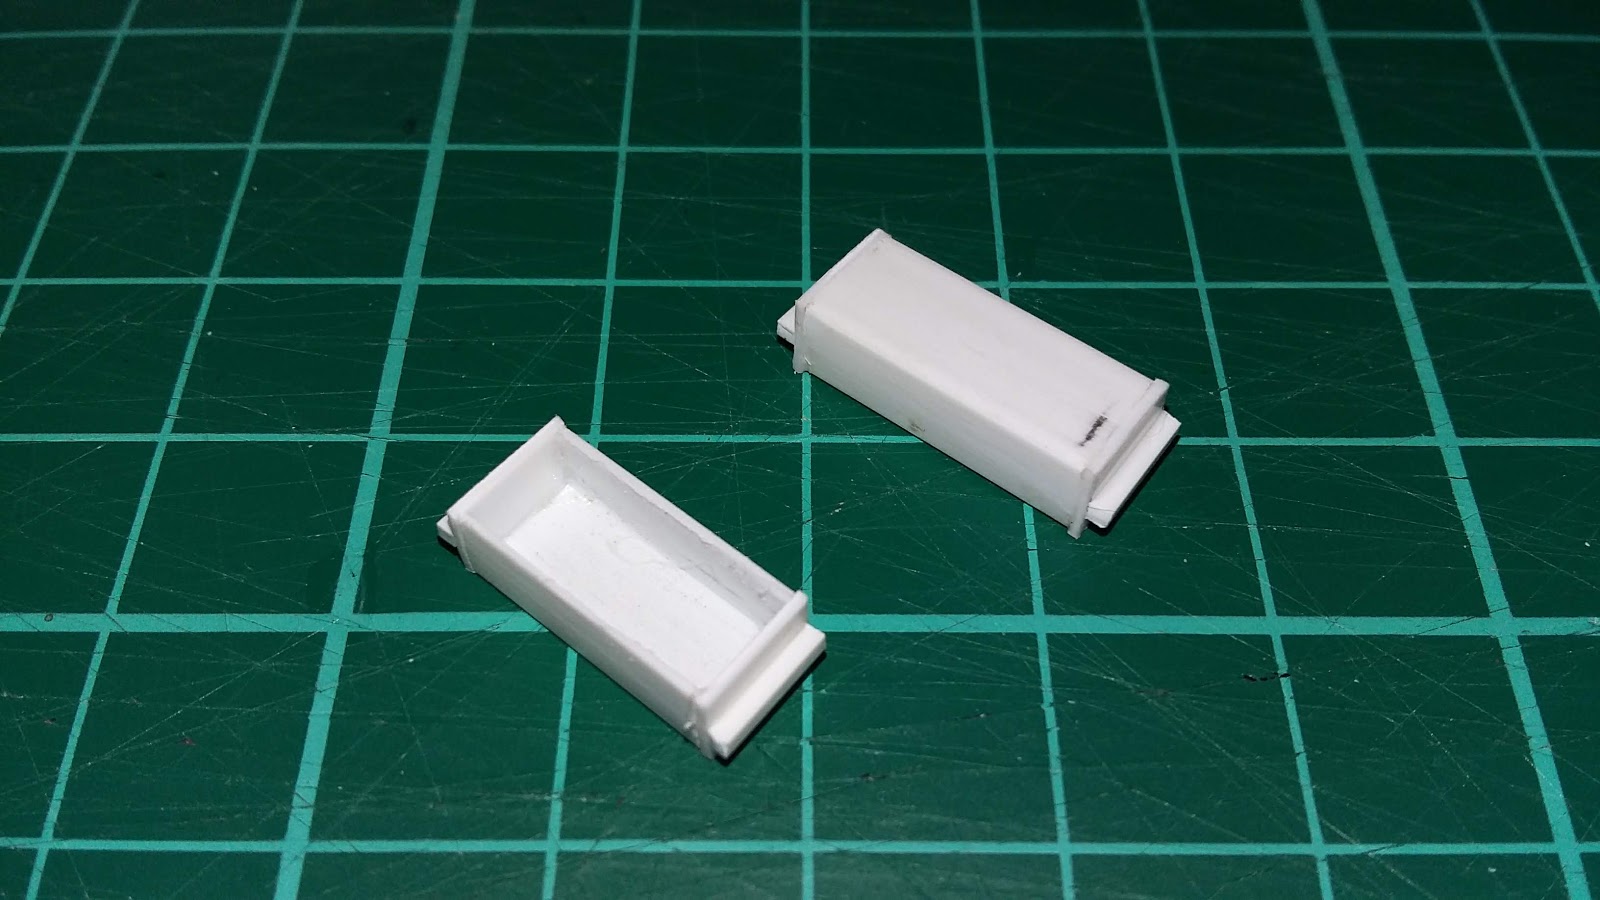
Picture 8, thin bar stuck to both ends on both open and closed crates. 

Picture 9, cut two strips of plastic bar for the bottom of each crate.

Picture 10, the two strips stuck in place on both the crates.

Picture 11, the solid crate now as the two strips of bar stuck on the opposite side.

Picture 12, shows the lid cut out of plastic card and the two strips of bar cut to stick on the outside of the lid. 

Picture 13, the thin strips of bar stuck in place.

Picture 14, the open and closed crate completed. 

Various crates and boxes made using the above method, adding different bits and pieces of thin plastic card and bar. 

Hopefully I've explained it well enough, and the pictures give you a rough idea to go by.

So thanks for looking and hopefully it's of some use. 

Thanks again
Cheers for now Russ 

Fresh Soviet troops arrive

I'm cracking on with my Soviets and here are the latest additions I've managed to muster. I decided to add a bit more detail to the bases! Hopefully it worked but I will leave it up to you guys to decide.

I enjoy building plastic figures, the scope to build figures that are unique as always appealed. Swap and change bits from other kits and mix and match. I get a chance to mess about and chop bits up.

So on to the figures

 the figures are again from both kits the winter box set and normal Soviet infantry set. 

 the bases are built up of odds and ends of plastic card, plastic strip and anything else I have hanging around. 

 the bandaged hand on the figure firing at the front was due to a slight error on my behalf, I mixed gloved hands and bare hands by accident! The mittens tucked in his belt kind of threw things out a bit. I could of just painted the figures in but the bandage idea got me round it. 

 Hopefully the bit extra effort with the bases show up.

 so there you go all done dusted and ready to join there Soviet brothers and sisters. 

So thanks for looking and i will catch you all again soon 
Thanks for looking 
  Cheers for now Russ 


Saturday 23 February 2019

German Armour from Warlord Games

Two days two posts, I'm definitely on a roll. This time I've finished up some German armour, it's taken a while to finish up the very last few bits but I got there in the end.

I started these months ago but like some projects they stalled in favour of other things! On saying that I've still a commander figure to paint for the Panzer 111 but apart from that I'm calling them done.

     
                       Sturmgeschűtz

 Every tank needs a commander so I decided to add a bit more detail! Helmet close at hand just incase, map, compass and binoculars just to add that bit more detail and interest. 


 I don't like side armour on tanks so I decided to add some logs instead,  they turned out pretty good to be honest although I must admit I did a trial run on a couple of the old airfix kits just to see if it would work. 

 The stowage is a mix of homemade crates and rolls and of course bits from the warlord games stowage set and the Tamiya 1/48th set. Add them all together and I think it works quite well. 


 the open crate on the back is simply thin plastic card with spare bits thrown in. All the traps and sheeting is made from tissue paper soaked in PVA and rolled up or stuck down. 

Hopefully I haven't overdone it but I couldn't resist adding that bit more detail. I'm not saying the kits needed it but I enjoy adding bits to me it's all part of the hobby I love. 

Panzer111

I picked up the zug box set but only managed to get one built! Which promptly got sold. So now I've finally finished the other two! 

 I decided to be boring and add more stowage but I did decide to build two different versions! Short and long barrelled versions to describe them more easily! 

 sorry but the phone was short on battery so I didn't get as many photos of these as I did the stuGs. 


So that's about it, I'm attending Hammerhead for the tabletop sale! In an attempt to thin out my collection, make some muched needed room and win some brownie points with my lovely wife. It will also give me an excuse to buy something new to paint. 


So keep looking and I will keep posting!
 Thanks again, cheers for now Russ 


Friday 22 February 2019

Warlord Games Napoleonic Portuguese Infantry

My latest additions to my over crowded hobby room are finished! Now Napoleonics are my nemesis and always have bring, I struggle with them and to be honest I've no idea why! I've always being captivated by the era, and the uniforms. I blame Airfix myself but I'm pretty sure I'm not alone in that train of thought. 

I'm no expert with Napoleonics and even less so with the Portuguese but that hasn't deterred me at all. So I've probably made some glaring mistakes but it won't be the first time or last. 

                         So onto the figures 

 It's strange but I think the uniform sums up the Napoleonic era,  the flags are included and I chose to paint them up as the second. I painted a few in different colour trousers just to add a bit more variety. 

 They are classed as easy build and to be honest it made a nice change compared to Victrix figures. Sometimes it's nice to be able to crack on with the painting and not fiddle with loads of parts. Most of the figures are made up of a body, a pack and a head! The flank company has seperate right arms and separate water bottle, so the most parts you have to stick together are five! 

 They do look good all lined up ready to fight, even if I do say so myself.

 Here they are in all their glory, colours flying and drums beating! They fought as good as they looked from what I've read, Old Nosey was truly impressed with them. 


So for now I've conquered my Nemesis! It may be a while before I paint anymore Napoleonics but I've plenty more stuff to paint and my WW2 Russians and Red Devils are still waiting patiently for the table to clear. 

So thanks for looking, feel free to comment and I will post again very soon!  Well that's the plan.

Thanks again 
Cheers for now Russ 


Saturday 9 February 2019

40k chaos

I've undertaken painting a small commission for a friend, I have in the past painted a few bits for him over the last few years and do it's nice to be asked to paint some fresh pieces for his collection. It's for his chaos army so the colour scheme is already set. It took a while to get into the style again but hopefully I've nailed it!

This time its was 5 chaos bikers and a converted chaos lord. I've built the bases up with cork, I used slate to make the first few for his army but I figured that the weight might of become an issue going forward.

                       The Models

 the 5 bikers all together! A few embellishments but nothing OTT 

 the leader popping the wheelie seemed to fit in ok so I went with it. 

 I haven't added anything to my 40k collection in quite some time! That may just change now, I forgot how nice GW stuff. 

 Blood for the Blood God! Liberal amounts of blood! 


 the chaos lord turned out pretty good, and I'm pretty pleased with the finished  figure. 

So that about wraps it up! 

Thanks for looking 
Cheers for n


Wednesday 6 February 2019

Soviet reinforcements arrive

I promised more recruits for my Soviet forces, and Mother Russia answered the call and sent more troops without hesitation. So another ten ready themselves for Not one step back!
       Now I'm a painter and collector so my mind does wander and I do get butterfly minded but my next post will probably prove that. Back to this post and on with my Russians. The rubble strewn bases are proving fun to do and hopefully they are capturing the look I was looking for. My mind always drifts to Stalingrad when painting these guys.

                            The Troops

 once again they are a mix of summer and winter uniforms although I have added gloves to try and balance out the look a bit. 

 I'm not sure how warm the quilted suits were but I'm guessing the Soviets were a pretty hardy people. The fur caps would certainly of kept out the cold but as for bullets and shrapnel I'm not so sure. 

 I love the charging pose, they add some real movement to the group. 

 a sight to strike terror into any heart! Soviet forces charging with fixed steel and flying lead! 

 so that's my latest recruits for my Soviet forces, I've still plenty more to go at but something else as tweaked my interest so we will see what wins! More Soviets or something new! 


Thanks for looking, feel free to comment 
All the best 
  Cheers for now Russ 


Sunday 3 February 2019

The Russians receive reinforcements

I'm known for my butterfly mind when it comes to painting,  one day saxons the next Bolt Action Red Devils! So even I'm not sure what will take my interest next? I will confess to having more than one project on the go at once 90% of the time. This is where the Russian's come into it! I painted my Soviet naval brigade a while back, probably longer ago then I actually think but it sparked an idea to convert some normal Warlord Games Soviets into more naval figures. Although my plan didn't actually work out as I planned! It did getting me building some Russians. I picked up a box of the Soviet winter troops to help with another project I'm working on. So I decided to build the figures that aren't suitable for my other project into Soviets! Radical idea I know, well for me anyway.

So on to the latest recruits for my Soviets!

       
 the uniforms are a mix of cold and warmer weather conditions. Anyone who as the standard box of BA plastic Soviets will know the box is a mix of the quilted and standard uniforms. 

 I do like both sets, and yes they mix and match perfectly! Ahhhhhh plastics you got to love um! 

 I had already started with the rubble strewn base so it made sense to carry on and make them all look the same. Besides it's quite fun making them and they sure are a nice change from my usual sand and stone bases. 

 Hopefully despite the odd mix of summer and winter uniforms they still look a cohesive enough force. 

These are the first of two new additions for my Soviet forces, the next will hopefully be finished in the coming week! 

So thanks for visiting my Hubble blog, feel free to comment and I will hopefully be posting again real soon
 Cheers for now Russ